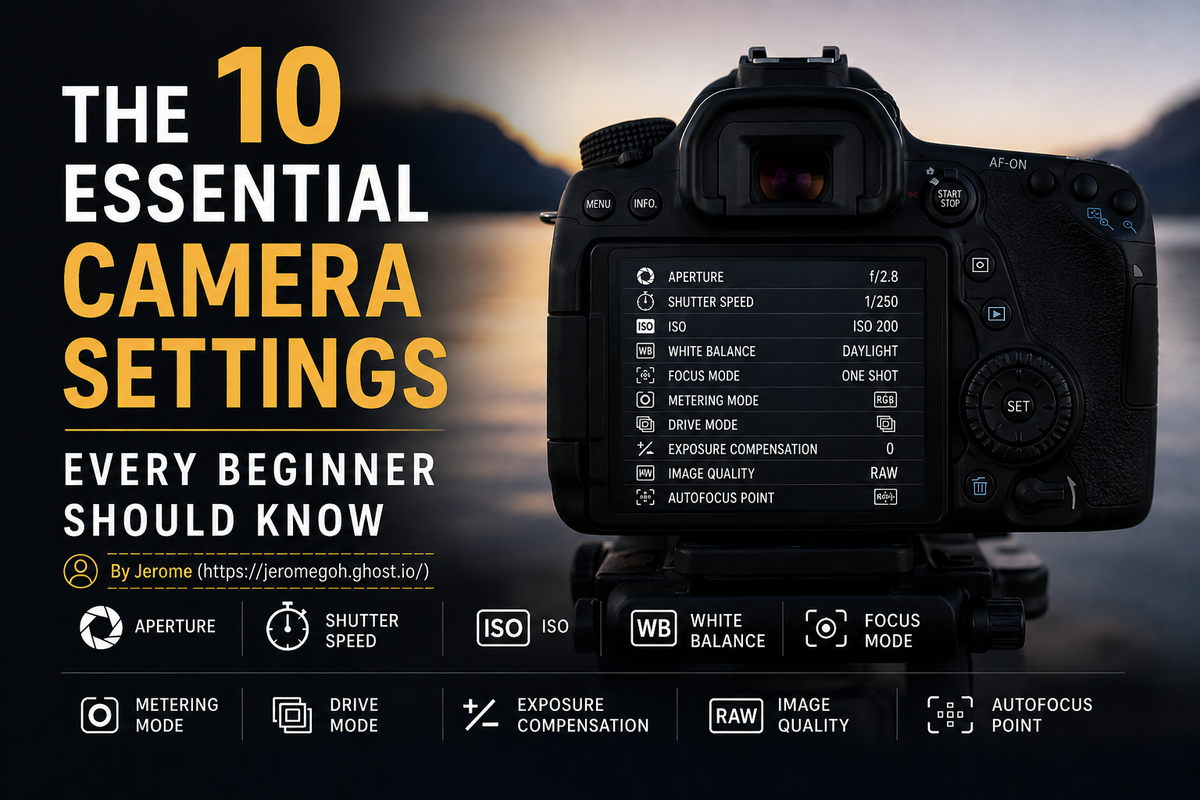
The 10 Essential Camera Settings Every Beginner Should Know
Understanding just a handful of camera settings can completely change your photography. In this guide, we'll look at the essentials that every beginner should know, without making things unnecessarily complicated.

Buying your first camera is exciting.
You finally have something that can take better photos than your phone, and you're eager to head out and start shooting. Then you switch it on... and suddenly you're faced with a menu full of strange words, abbreviations, and settings you've never heard of.
RAW. JPEG. Aperture. ISO. Shutter Speed.
It can feel overwhelming.
I know because I've been there.
When I first got into photography, I spent countless hours watching YouTube videos, reading books, articles, and experimenting with my camera just to understand what all these settings actually meant. Looking back now, I realise that many of those concepts aren't difficult, they just weren't explained in a simple, beginner-friendly way.
That's exactly why I'm writing this post.
My goal isn't to turn you into a professional photographer overnight. Instead, I want to help you understand the camera settings that matter most, so you can spend less time feeling confused and more time doing what photography is all about, getting out there and taking pictures.
Let's start with something that every new photographer will come across almost immediately...
1. Understanding Camera File Types
One of the first settings you'll find on almost every camera is the option to choose what type of file your photos will be saved as. It might seem like a small decision, but it can make a big difference to your photography.
The good news is that there are only three file types that most beginners really need to know about.
JPEG (.JPG)
JPEG is the format that most people use.
When you take a photo in JPEG, your camera processes the image for you. It adjusts things like colour, contrast, and sharpness before saving the finished photo to your memory card. The result is a file that's ready to share straight away.
The biggest advantage is that JPEG files are relatively small, meaning you can fit thousands of photos onto a memory card. They're also easy to upload to social media, email to friends, or print without doing any editing.
The downside is that, to keep the file size small, the camera permanently removes some of the image data. For everyday photography this usually isn't a problem, but it does mean you have less flexibility if you later decide to edit the photo.
If you're just starting out, JPEG is a fantastic place to begin.
RAW
RAW is a little different.
Think of it as your camera saving everything the sensor captured, without throwing away any information. Instead of creating a finished photo, it saves all the data so you can decide later how you want the image to look.
This gives you much more control when editing. You can recover details from bright skies, brighten dark shadows, and even correct the white balance without noticeably reducing image quality.
The trade-off is that RAW files are very much larger than JPEGs and they usually need to be edited(aka 'Post-Processed') and saved as Jpeg files before they're ready to be shared.
If you intend to edit your photos or want the highest image quality possible, RAW is definitely worth learning.
To edit RAW files, photographers commonly use programs such as Adobe Lightroom, Adobe Photoshop, Capture One, Darktable, and the free software that often comes with the camera, such as Canon Digital Photo Professional or Nikon NX Studio. These programs allow you to adjust exposure, recover detail from bright skies and dark shadows, change white balance, and fine-tune colours without noticeably reducing image quality. RAW files are very much larger than JPEGs, but the extra size becomes worth it when you are photographing scenes with difficult lighting, such as sunsets, landscapes, indoor events, or high-contrast situations where you may need to recover lost detail later. If you plan to edit your photos, print them, or want the highest quality possible, shooting in RAW gives you far more flexibility than JPEG because all the detail from the scene is saved in the file and that will allow you to make any required corrections in post-processing (aka 'post' for short) if needed. For quick snapshots or for photos that don't need heavy editing later, JPEG is usually sufficient and will save you a lot of storage space.
One thing to remember is that "RAW" isn't actually a single file type. Different camera manufacturers use different file extensions. For example, Canon uses .CR3, Nikon uses .NEF, Sony uses .ARW, and Fujifilm uses .RAF. Even though the names are different, they all serve the same purpose, they store as much information from the camera's sensor as possible.
HEIF (or HEIC)
Some newer cameras also offer a format called HEIF (sometimes shown as HEIC).
You can think of it as the modern version of JPEG. It produces excellent image quality while keeping file sizes smaller than RAW and often even more efficient than JPEG.
If you own an iPhone, you've probably already been using this format without even realising it. By default, iPhones save photos as HEIC, which is Apple's version of the HEIF format. The reason Apple adopted it is simple, it delivers better image quality while taking up less storage space than a traditional JPEG.
HEIF also supports a wider range of colours and can store extra information, such as the depth data used for Portrait Mode on iPhones.
The only downside is that not every computer, website, or editing program supports HEIF or HEIC yet. While compatibility has improved significantly over the years, you may still come across older software or websites that prefer JPEG files.
If you're sharing photos online or with friends and family, JPEG is still the safest and most widely compatible option. But if your camera supports HEIF and your editing workflow is compatible, it's an excellent alternative that offers impressive image quality without the large file sizes of RAW.
Which One Should You Choose?
If you're completely new to photography, I'd recommend shooting in JPEG while you learn the basics of composition, lighting, and camera controls.
Once you become more comfortable and want to start editing your images, try switching to RAW. The extra flexibility is well worth it.
Many cameras even let you shoot RAW + JPEG, giving you the best of both worlds. You'll have a ready-to-share JPEG and a high-quality RAW file if you decide to edit the image later.
For most photographers, these are the only file types you'll ever really need to know.
2. Understanding Shooting Modes
Once you've decided what file type to save your photos in, the next setting you'll probably notice is the mode dial on top of your camera. It might have letters like Auto, P, A (or Av), S (or Tv), and M.
At first glance, these letters can seem confusing, but they all do one simple thing, they determine how much control you want over your camera.
Think of it like driving a car.
Sometimes you just want to get from A to B without thinking too much, so you drive an automatic. Other times, you might want more control over how the car performs. Camera shooting modes work in a very similar way.
Let's take a look at what each mode does.
Auto Mode
Auto Mode is exactly what it sounds like.
The camera makes almost every decision for you. It chooses the aperture, shutter speed, ISO, white balance, focus mode, and sometimes even whether the flash should pop up.
All you have to do is point the camera and press the shutter button.
This is a great mode when you're just getting started or when you need to capture a moment quickly without worrying about settings.
The downside is that the camera doesn't know what you're trying to achieve. It doesn't know whether you're photographing a beautiful sunset, a fast-moving dog, or someone standing in front of a scenic background. It simply makes what it thinks is the best decision.
Auto Mode is excellent for learning your camera, but as you gain confidence, you'll probably find yourself wanting a little more creative control.
Program Mode (P)
Program Mode is often overlooked, but it's a fantastic stepping stone between Auto and the more advanced modes.
In Program Mode, the camera still chooses the aperture and shutter speed for you, but you can control many of the other settings, such as ISO, white balance, autofocus mode, and exposure compensation.
Think of it as Semi-Auto Mode.
You still get plenty of help from the camera, but you also begin making some creative decisions yourself.
It's a great mode for beginners who are ready to move beyond Auto but aren't quite comfortable controlling everything manually.
Aperture Priority (A or Av)
Aperture Priority is where photography starts to become really fun.
In this mode, you choose the aperture, and the camera automatically selects the shutter speed needed for a correct exposure.
Why would you want to do that?
Because the aperture controls how much of your photo is in focus.
If you're taking a portrait and want the background to look beautifully soft and blurry, you can choose a wide aperture like f/1.2, f/1.8, or f/2.8.
If you're photographing a landscape and want everything from the flowers in the foreground to the mountains in the distance to appear sharp, you might choose f/8 or f/11.
Once you've chosen the aperture, the camera does the rest.
For many photographers, Aperture Priority becomes the mode they use most often because it offers an excellent balance between creative control and convenience.
Shutter Priority (S or Tv)
Shutter Priority works the opposite way.
Here, you choose the shutter speed, and the camera automatically selects the aperture.
This mode is perfect when movement is your biggest concern.
If you're photographing children running around, birds in flight, or a sporting event, you'll usually want a fast shutter speed to freeze the action.
On the other hand, if you're photographing a waterfall or want to capture light trails from passing cars at night, you can choose a slower shutter speed to create beautiful motion blur.
Instead of worrying about all the camera settings, you simply decide whether you want to freeze movement or show movement, and the camera takes care of the rest.
Manual Mode (M)
Manual Mode gives you complete control over your camera.
You choose the aperture.
You choose the shutter speed.
You choose the ISO.
Nothing changes unless you change it.
At first, Manual Mode can feel intimidating because there are more settings to think about. Everything needs to work together, choose too high or fast a shutter speed, and your image may be under-exposed (too dark) because not enough light was able to hit the sensor, too slow a shutter speed and your image may now be over-exposed (too-bright) because too much light hit the sensor.
The same goes for aperture, too large an aperture on a sunny day (f/2.8 for example) and you image may be over-exposed because too much light was let in and too small an aperture (f/11 for example) and you image may be under-exposed because of the opposite effect.
The sweet spot, is to get the aperture, shutter speed and ISO to compliment each other for the type of photograph you want.
For example, if you want to shoot a portrait with beautiful bokeh (Soft, smooth blur behind your subject) but opening up your aperture to f/2.8 will cause your image to over-expose, you can increase your shutter speed to reduce the amount of light reaching the sensor or you can fit a ND filter on the front of your lens.
(Also known as Neutral Density filters - an ND filter is like a pair of sunglasses for your camera lens. It reduces the amount of light entering the camera without changing the colors of the scene. This allows you to use slower shutter speeds or wider apertures, even when you're shooting in bright daylight. )
That being said, once you understand how aperture, shutter speed, and ISO work together, it becomes much easier to shoot the images you want.
Why use Manual mode if it is so tricky to master?
One of the biggest advantages of Manual Mode is consistency. If you're photographing in the same lighting conditions, every image can have exactly the same exposure because the camera isn't making adjustments from one shot to the next.
It's an incredibly useful mode, but don't feel like you need to use it straight away. Many experienced photographers still use Aperture Priority or Shutter Priority for everyday photography and ever-changing lighting conditions because they're often faster and more practical.
So,Which Mode Should You Use?
If you're completely new to photography, there's nothing wrong with starting in Auto Mode while you get comfortable holding the camera and composing your photos.
Once you feel more confident, try experimenting with Program Mode to begin taking control of some of the settings yourself.
After that, I'd encourage you to spend most of your time in Aperture Priority or Shutter Priority. These two modes give you creative control without requiring you to manage every single setting manually.
Eventually, when you understand how aperture, shutter speed, and ISO work together, you'll probably feel ready to explore Manual Mode.
Remember, becoming a better photographer isn't about using the most advanced mode on your camera. It's about understanding what each mode does and choosing the one that's best suited to the photo you're trying to take.
3. Understanding Aperture
If you've ever wondered how photographers create those beautiful portraits where the person is perfectly sharp but the background is soft and blurry (Bokeh), the answer is usually aperture.
Aperture is one of the most important settings on your camera because it controls two things:
- How much light enters the camera.
- How much of your photo is in focus.
The easiest way to understand aperture is to imagine the pupil of your eye.
When you're in a dark room, your pupils become larger to let in more light. When you step outside on a bright sunny day, they become smaller to let in less light.
Your camera works in exactly the same way.
Inside your lens is an opening called the aperture. It can become larger or smaller depending on the setting you choose.
Understanding f-numbers
Aperture is measured using f-numbers also known as f-stops, such as:
- f/1.8
- f/2.8
- f/4
- f/5.6
- f/8
- f/11
- f/16
This is where many beginners get confused.
You would naturally think that a bigger number means a bigger opening, but with aperture it's actually the opposite.
A small f-number (like f/1.8) means the aperture opening is large, allowing lots of light into the camera.
A large f-number (like f/16) means the opening is small, allowing much less light in.
It's one of those photography quirks that seems strange at first, but after using your camera for a while, it quickly becomes second nature.
How Aperture Affects Your Photos
Besides controlling the amount of light entering the camera, aperture also controls something called depth of field.
Depth of field simply refers to how much of your photo appears sharp and in focus.
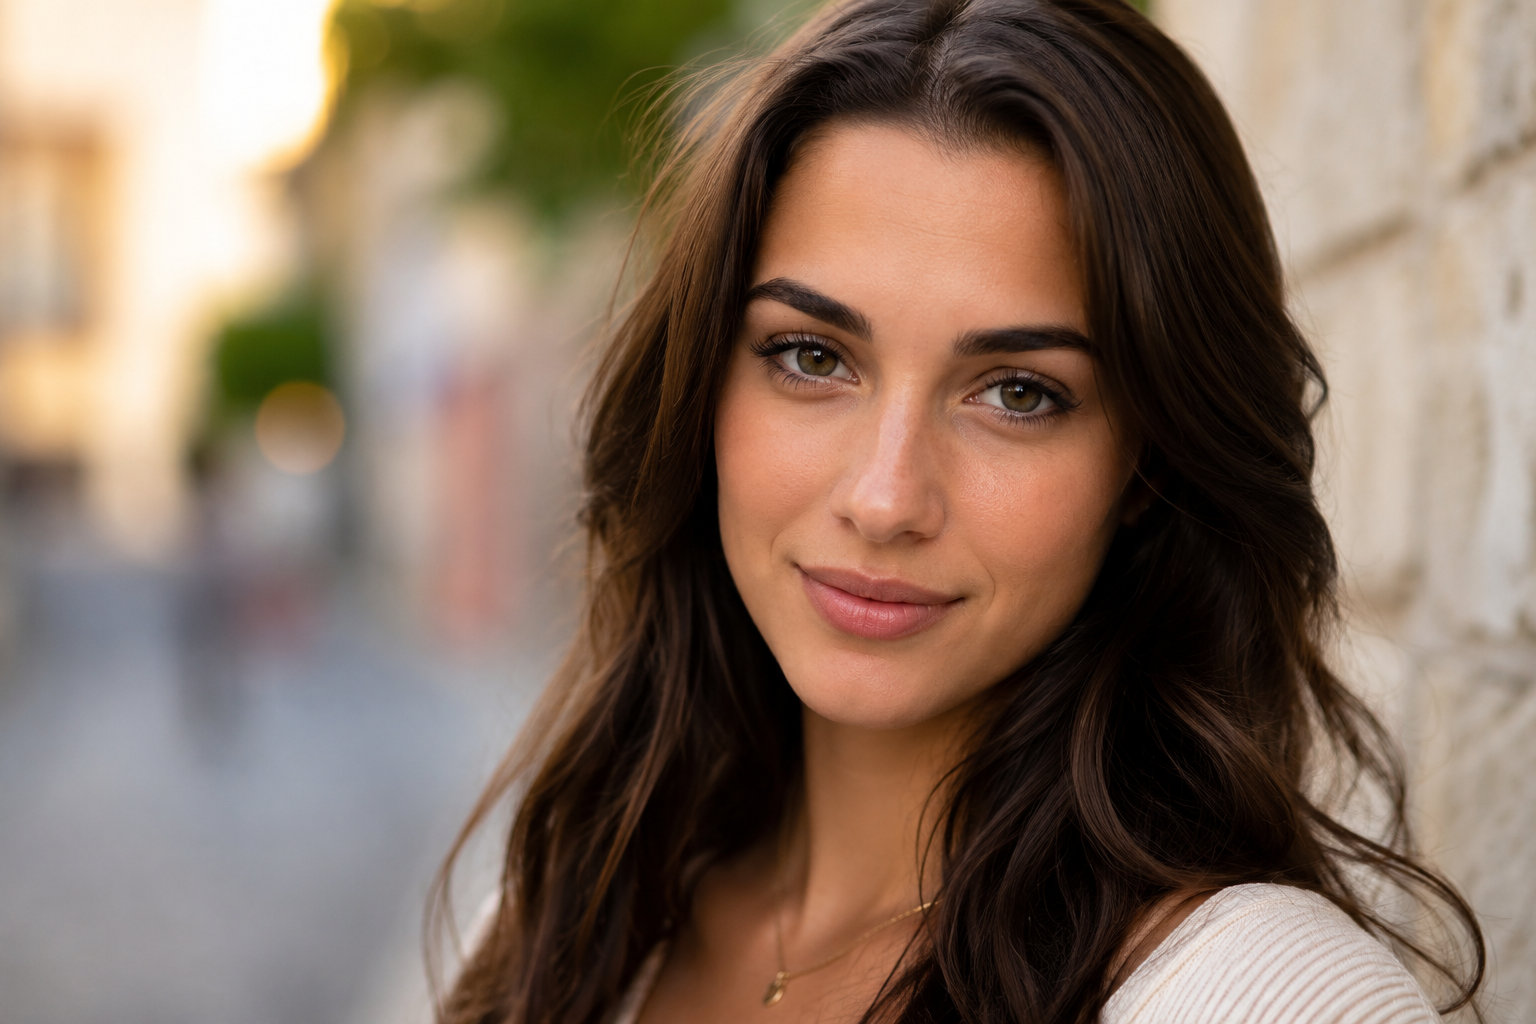
A Wide Aperture (Small f-number)
Settings like f/1.8, f/2, or f/2.8 create a shallow depth of field.
This means your subject stays sharp while the background becomes beautifully blurred.
This effect is especially popular for:
- Portrait photography
- Pet photography
- Flower photography
- Food photography
It helps your subject stand out from the background and gives your images that professional look many people admire.
A Narrow Aperture (Large f-number)
Settings like f/8, f/11, or f/16 create a greater depth of field.
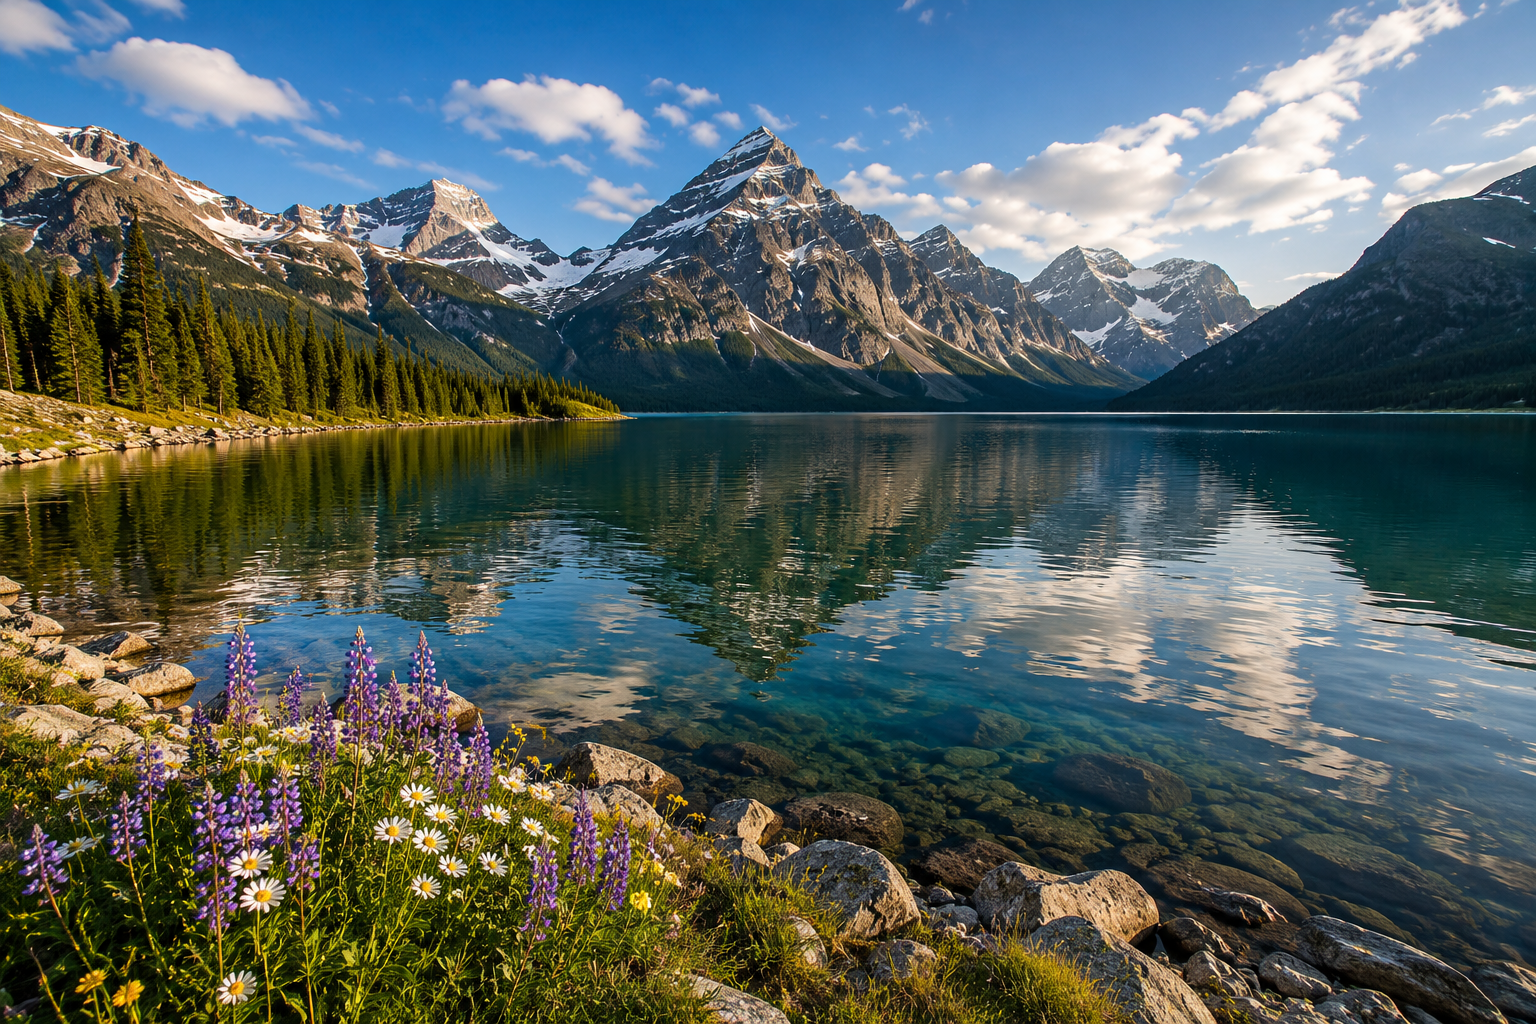
Instead of only one part of the image being sharp, much more of the scene stays in focus.
This is perfect for:
- Landscape photography
- Cityscapes
- Architecture
- Group photos
If you're standing on a mountain overlooking a beautiful valley, you'll probably want both the flowers in front of you and the mountains in the distance to appear sharp. A smaller aperture helps you achieve exactly that.
Which Aperture Should You Use?
There isn't one "correct" aperture for every photo, it all depends on what you're trying to create.
As a general guide:
- f/1.2 to f/2.8 → Portraits and subjects with blurry backgrounds.
- f/4 to f/5.6 → Everyday photography and isolating a subject while keeping a little more in focus.
- f/8 to f/11 → Landscapes, travel, and scenery where you want most of the image to be sharp.
- f/16 and above → Situations where you want as much of the scene in focus as possible.
Don't Worry About Memorising It
When I first started learning photography, I tried to memorise every aperture setting and when to use it.
Looking back, I realise that wasn't necessary.
Instead, ask yourself one simple question before taking a photo:
"Do I want a blurry background, or do I want everything in focus?"
If you want a blurry background, choose a smaller f-number like f/1.8 or f/2.8.
If you want more of the scene to stay sharp, choose a larger f-number like f/8 or f/11.
It really is that simple.
As you continue practising, choosing the right aperture will become second nature, and you'll start using it creatively without even thinking about it.
4. Understanding Shutter Speed
Imagine trying to take a photo of a dog running through a park.
Do you want to freeze the action so every strand of fur is perfectly sharp? Or would you rather show the movement with a slight blur to make the photo feel more dynamic?
The answer lies in shutter speed.
Shutter speed is simply the amount of time your camera's shutter stays open to let light reach the camera's sensor.
Think of it like opening and closing a curtain.
If you open the curtain for only a brief moment, very little light comes in. Leave it open for longer, and much more light enters the room.
Your camera works in exactly the same way.
A fast shutter speed lets in less light but freezes movement. A slow shutter speed lets in more light but records movement as blur.
Understanding Shutter Speed
Shutter speed is usually measured in fractions of a second.
For example:
- 1/1000 sec
- 1/500 sec
- 1/250 sec
- 1/125 sec
- 1/60 sec
- 1/30 sec
As the shutter speeds become slower than one second, your camera will usually display them like this:
- 1 second
- 2 seconds
- 5 seconds
- 10 seconds
- 30 seconds
At first, these numbers can seem confusing, but here's an easy way to remember them:
The larger the number underneath the fraction, the faster the shutter speed.
So:
- 1/1000 sec is much faster than 1/60 sec.
- 1/60 sec is much faster than 1 second.
Fast Shutter Speeds
Fast shutter speeds freeze movement.
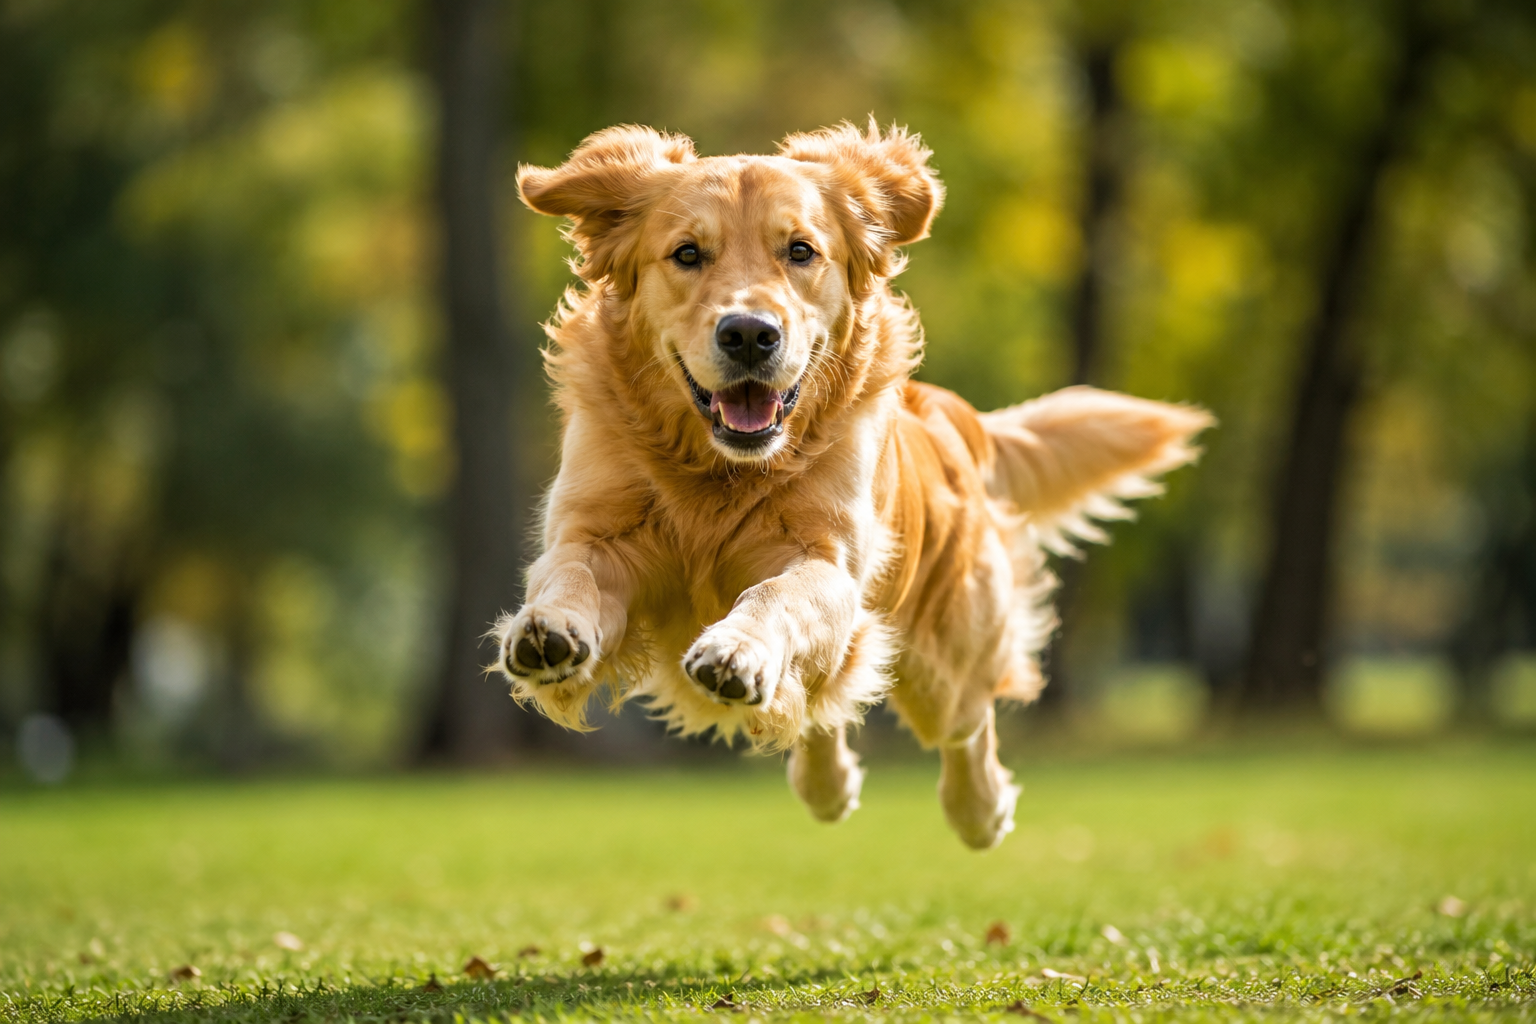
If your subject is moving quickly, using a fast shutter speed helps keep everything nice and sharp.
A fast shutter speed is perfect for:
- Sports
- Birds in flight
- Wildlife
- Children running around
- Pets playing
For example, if you're photographing your dog chasing a ball, a shutter speed of around 1/1000 second will usually freeze the action beautifully.
Slow Shutter Speeds
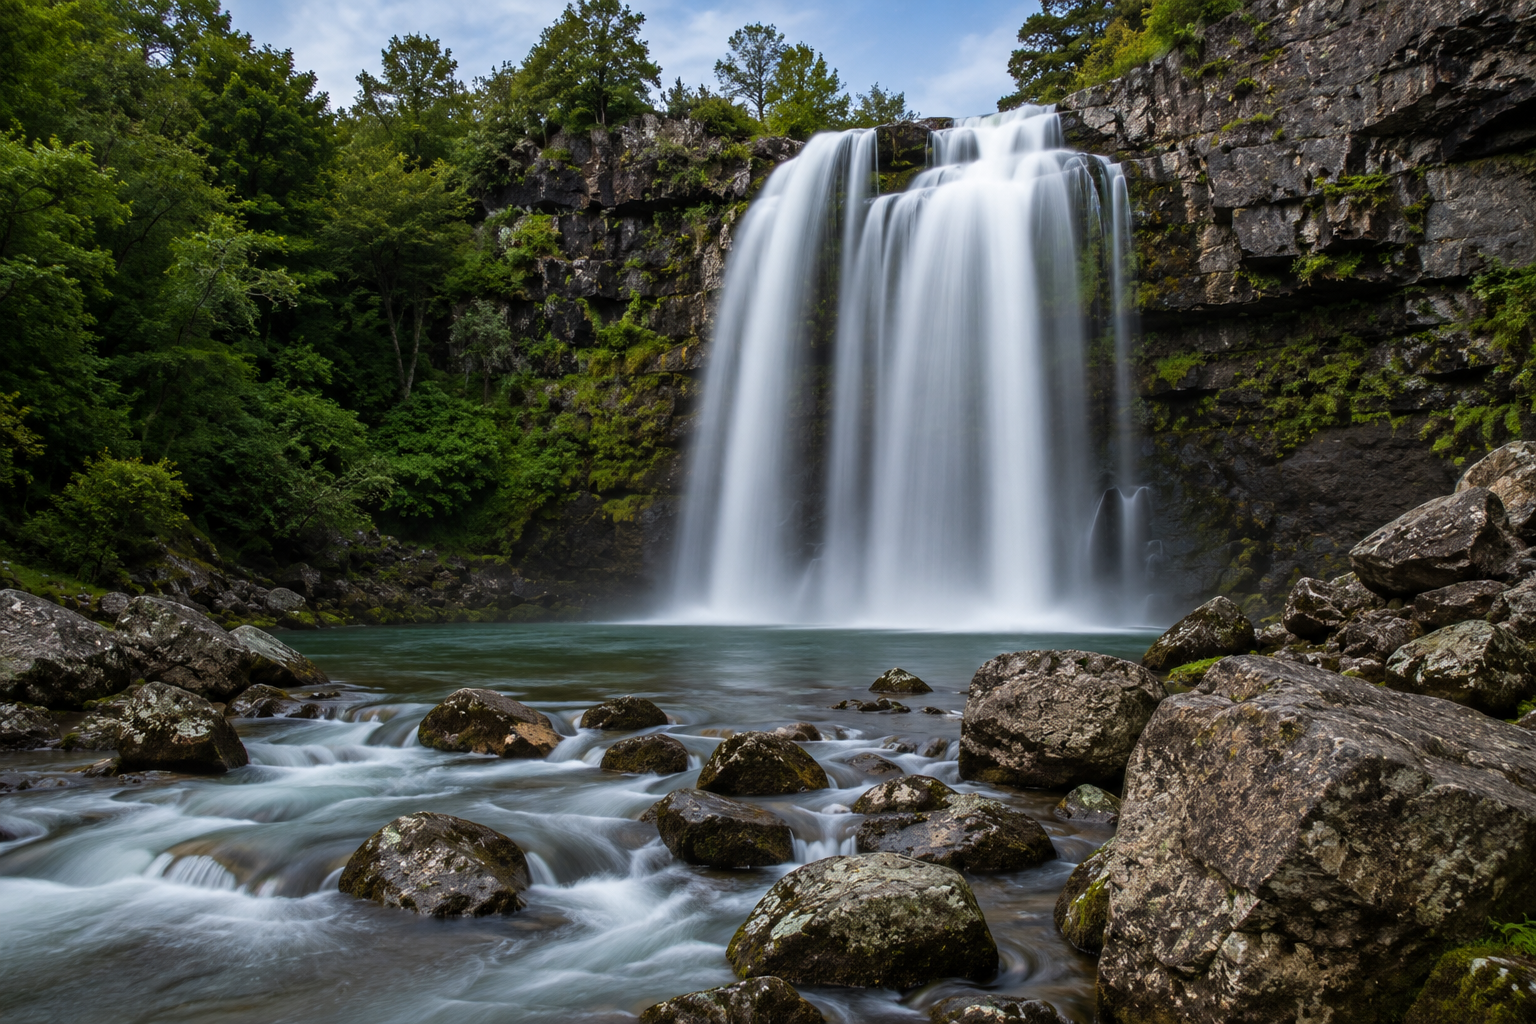
Slow shutter speeds allow movement to appear in your photographs.
Instead of freezing everything, the camera records motion as soft, natural blur.
This can create some beautiful creative effects.
Slow shutter speeds are commonly used for:
- Waterfalls
- Rivers
- Ocean waves
- Light trails from passing cars
- Fireworks
- Night photography
If you've ever seen a photo where a waterfall looks silky smooth, that's almost always the result of using a slow shutter speed (as well as a ND filter on the front of the lens to reduce the amount of light coming in - there is a easy to understand explanation of ND filters above).
One Thing Every Beginner Should Know
As your shutter speed becomes slower, it also becomes easier to accidentally blur your photo by moving the camera.
Even tiny movements from your hands can make the whole image look soft and/or out of focus.
As a general rule, if you're shooting handheld, try not to let your shutter speed become too slow unless your camera or lens has image stabilisation.
For longer shutter speeds, a tripod is usually the best option. It keeps the camera completely still while the shutter is open.
Which Shutter Speed Should You Use?
Like aperture, there's no single "correct" shutter speed. It all depends on the photo you want to create.
As a general guide:
- 1/1000 sec or faster → Sports, birds, wildlife, fast-moving pets.
- 1/500 sec → Children playing, cyclists, everyday action.
- 1/250 sec → Walking people and general photography.
- 1/125 sec → Portraits and still subjects.
- 1/60 sec and slower → Low-light situations where your subject isn't moving much.
- 1 second or longer → Waterfalls, rivers, light trails, fireworks, and creative night photography (usually with a tripod).
The Simple Way to Think About Shutter Speed
Before you take a photo, ask yourself one question:
"Do I want to freeze the movement, or do I want to show the movement?"
If you want everything to look sharp, use a fast shutter speed.
If you want to create a sense of motion, use a slower shutter speed.
Once you start thinking this way, shutter speed becomes much easier to understand, and you'll begin using it creatively instead of simply accepting whatever setting the camera chooses.
Jerome's Tip: When using slow shutter speeds, ND filters and Tripods are a must to have on hand. Tripods prevent movement while the shutter is open and ND filters control how much light is let in.
*There are different strengths (also known as stops) of ND filters which you will use according to the amount of light you want to let in. Landscape and Portrait photographers usually carry a few ND filters of different strengths with them. They use whichever is necessary.
5. Understanding ISO
Imagine you're taking photos outside on a bright, sunny afternoon.
The light is plentiful, and your camera has no trouble capturing a bright, well-exposed image.
Now imagine the sun has gone down, and you're indoors at a birthday party. Suddenly, there's much less light available, and your camera has to work a little harder.
This is where ISO comes in.
ISO controls how sensitive your camera is to light.
The lower the ISO, the less sensitive the camera is to light. The higher the ISO, the more sensitive it becomes, allowing you to take brighter photos in darker conditions.
Understanding ISO Numbers
Most cameras have an ISO range that looks something like this:
- ISO 100
- ISO 200
- ISO 400
- ISO 800
- ISO 1600
- ISO 3200
- ISO 6400
The numbers are actually quite easy to understand.
As the number gets higher, your camera becomes more sensitive to light.
So:
- ISO 100 is best for bright, sunny conditions.
- ISO 400 works well on cloudy days or in the shade.
- ISO 1600 or higher is often useful indoors or at night when there's much less available light.
There's a Trade-Off
If increasing the ISO makes your photos brighter, you might be wondering:
"Why not just leave it at the highest setting all the time?"
The answer is because increasing the ISO also increases image noise.
Noise appears as tiny coloured or grainy specks throughout your photo, especially in darker areas. As the ISO gets higher, the image usually becomes less detailed and loses some of its overall quality.
Modern cameras are much better at handling high ISO than older models, but the trade-off still exists.
Choosing the Right ISO
A good habit to develop is to use the lowest ISO that still allows you to take the photo you want.
For example:
- A sunny day outdoors → ISO 100
- A cloudy afternoon → ISO 200–400
- Indoors with good lighting → ISO 800–1600
- Night photography or very dark scenes → ISO 3200 or higher (if needed)
Remember, these aren't strict rules. They're simply good starting points.
Should You Use Auto ISO?
Most modern cameras include an Auto ISO setting.
When it's turned on, your camera automatically increases or decreases the ISO depending on the available light.
For beginners, this can be incredibly helpful.
It allows you to focus on learning aperture and shutter speed without constantly worrying about adjusting another setting. As you gain experience, you can always switch to setting the ISO manually when you want complete control.
The Simple Way to Think About ISO
Before changing your ISO, ask yourself one question:
"Is there enough light?"
If there is plenty of light, keep your ISO low.
If the scene is too dark and you can't brighten it by changing your aperture or shutter speed, increase the ISO until you get the exposure you need.
As a general rule, try to use the lowest ISO possible, but don't be afraid to raise it when the situation calls for it. A slightly noisy photo is almost always better than a perfectly clean photo that's too dark or blurry to use.
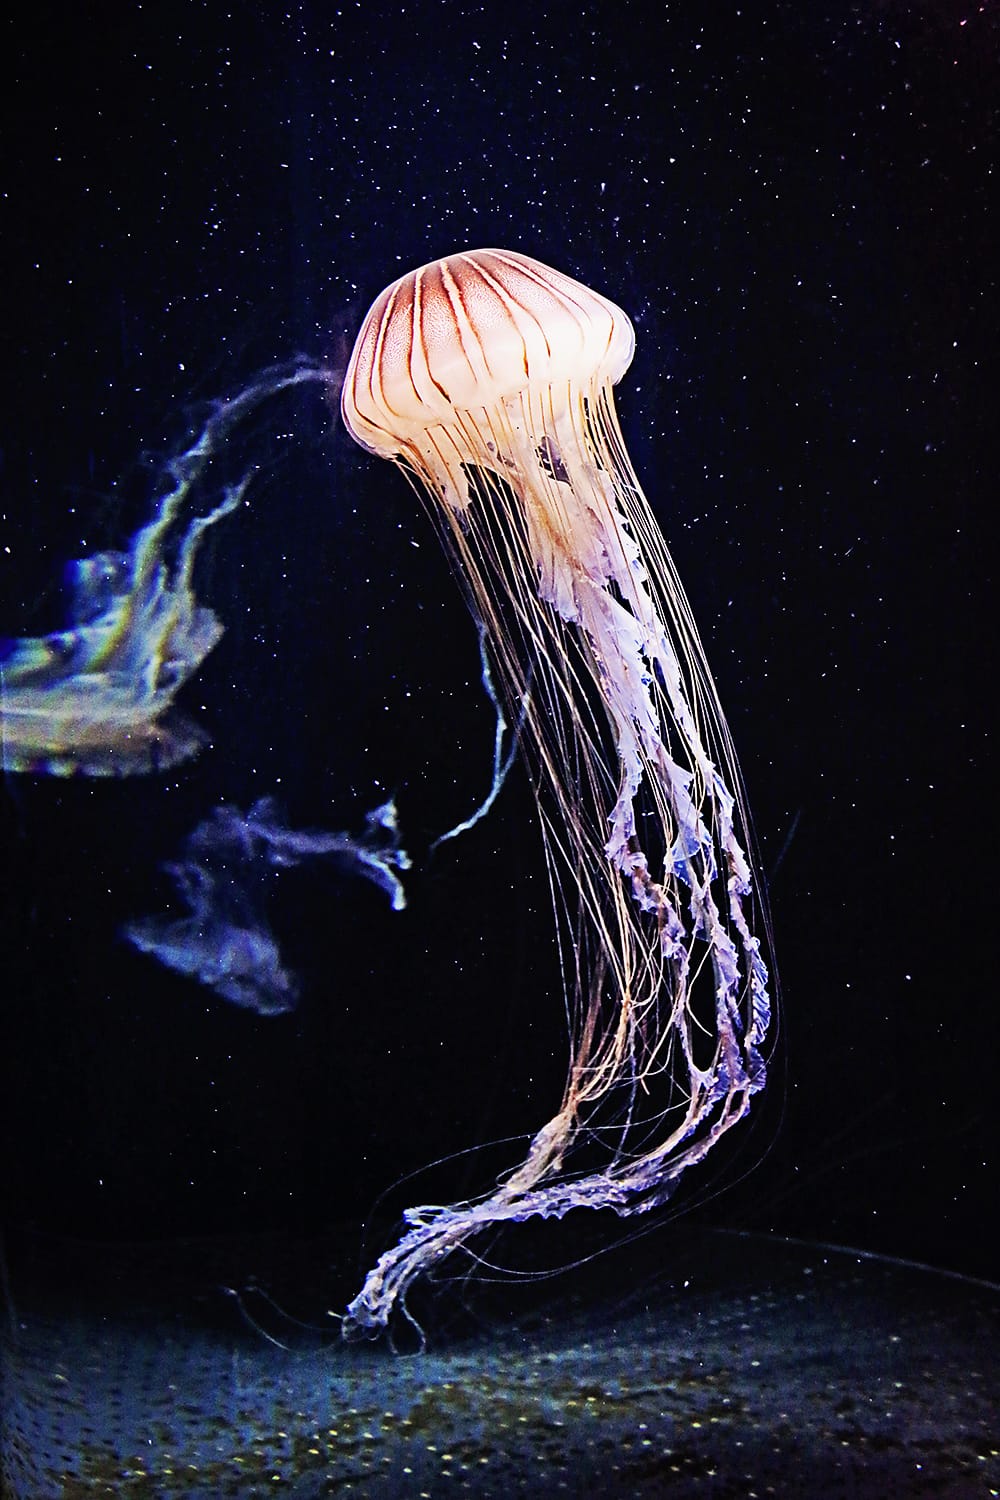
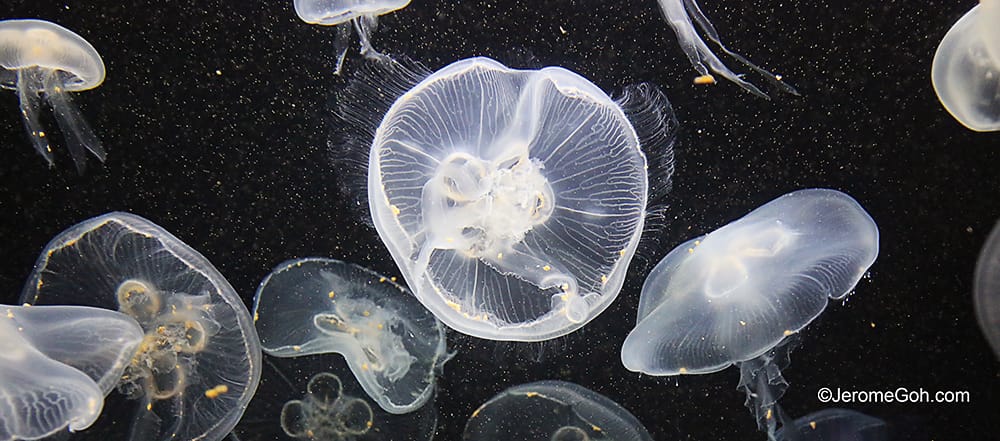
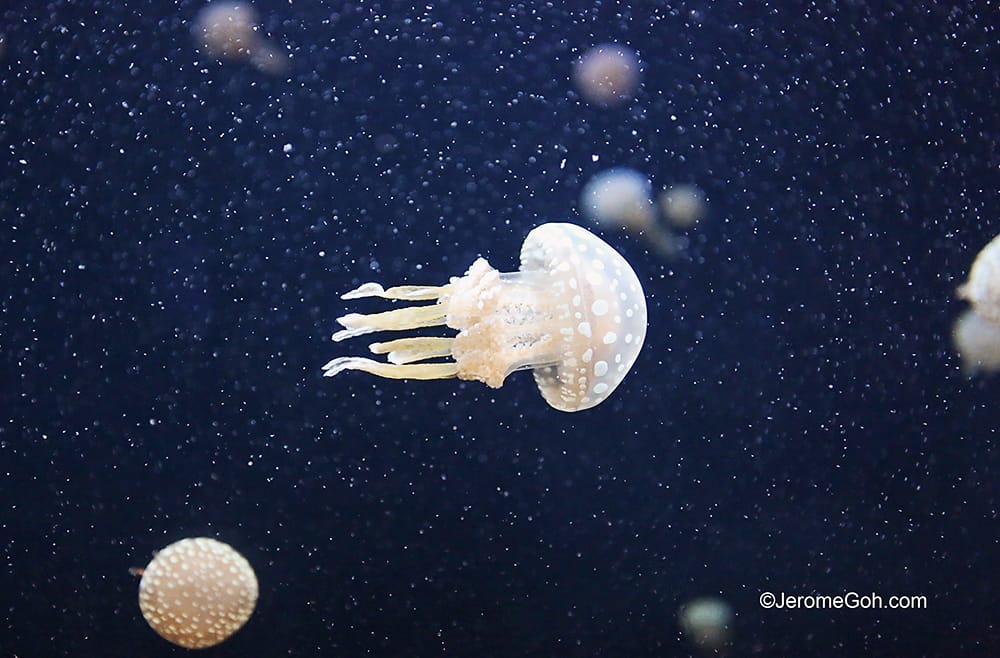
Jerome's Tip: Unlike 10 to 15 years ago, most modern cameras handle noise at high ISOs very well so don't be afraid to experiment. Below are images of Sea jellies (aka Jellyfish) I shot at the Singapore Oceanarium at very high ISOs.
6. Understanding White Balance
Have you ever taken a photo indoors and noticed that everything looks slightly orange?
Or maybe you've taken a picture outside in the shade and wondered why it has a blue tint?
If so, you've already seen what white balance does.
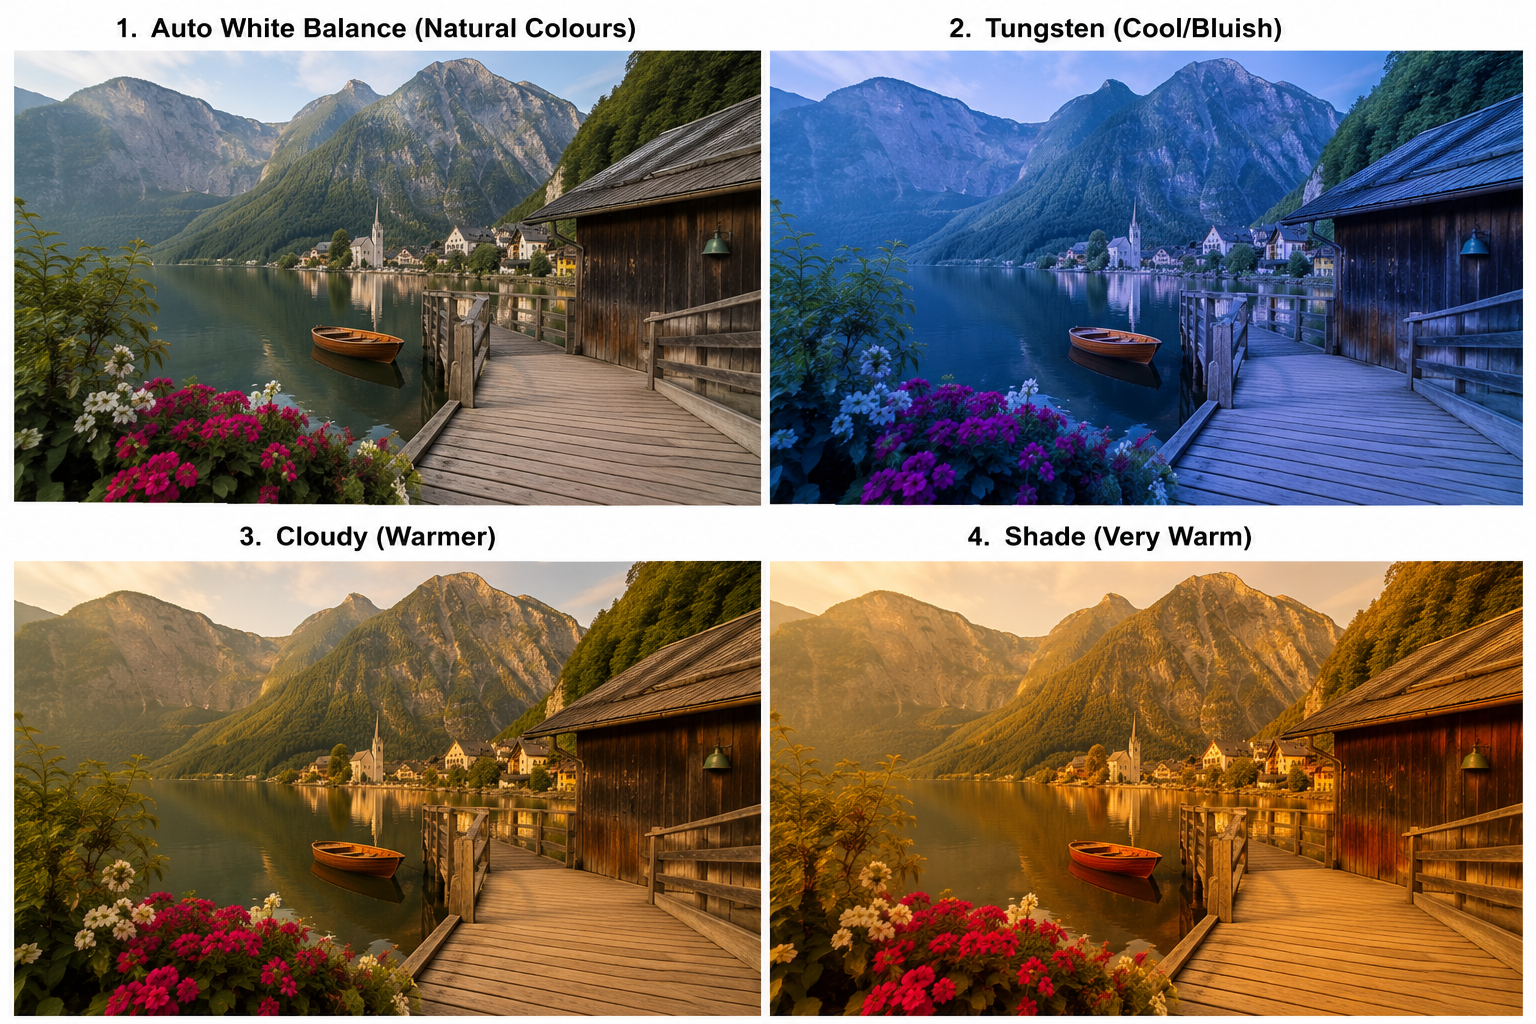
White balance helps you control how accurate the colors of your pictures appear and the goal is simple: something that is white in real life should also look white in your photograph. When white in real life is white in your pictures, the other colors will be recreated more accurately as well.
That being said, white balance can be used to create different 'moods' for pictures. I know of photographers who like their pictures to be 'warm' in tone, thus they use the WB controls to give their pictures a slightly brown tinge. Whereas some prefer a 'cool' tone (Sometimes seen in print advertisements) , and use the WB controls to give their images a 'blue tinge'.
Why Does White Balance Matter?
Different light sources have different colours.
For example:
- The sun on a clear day produces fairly neutral light.
- A cloudy sky creates cooler, slightly blue light.
- Household light bulbs often produce warm, yellow or orange light.
- Fluorescent lights can sometimes give photos a green tint.
Although our eyes automatically adjust to these different lighting conditions, cameras don't always get it right.
That's why your camera uses white balance, to compensate for the colour of the light and produce more natural-looking photos.
Auto White Balance (AWB)
Most cameras have a setting called Auto White Balance, often shown as AWB.
In this mode, the camera analyses the scene and automatically decides what it thinks the correct white balance should be.
For most everyday outdoor photography, Auto White Balance does an excellent job. The part where AWB struggles is when it is indoors and the color of the lights confuse it.
In ever changing lighting conditions, many photographers just leave their camera on AWB most of the time though and then correct the White balance in Post processing. Saving your images as RAW files also helps, often the white balance can be corrected with one click, and I will show how it is done later in this section.
White Balance Presets
If you want a little more control, your camera also includes several white balance presets.
These are designed for different lighting conditions.
Daylight ☀️
Use this when you're shooting outdoors in bright sunshine.
It produces natural-looking colours under direct sunlight.
Cloudy ☁️
Cloudy weather often gives photos a slightly cool, blue appearance.
The Cloudy setting adds a little warmth to make colours look more natural.
Many photographers also like using this setting on sunny days because it creates a slightly warmer, more inviting look.
Shade 🌳
Photos taken in the shade can often appear quite blue.
The Shade setting adds even more warmth than the Cloudy setting, helping skin tones and colours look more natural.
Tungsten 💡
Traditional household light bulbs produce very warm, orange light.
The Tungsten setting cools down the image to remove that orange colour cast.
Fluorescent
Fluorescent lighting can sometimes make photos look green.
This setting helps neutralise those green tones for more accurate colours.
For myself, I hardly use these presets on my camera because they seldom correct the white balance as I need them to. But you can experiment to see if they work for you.
Can You Change White Balance Later?
If you're shooting in JPEG, it's best to get the white balance as close to correct as possible when taking the photo.
However, if you're shooting in RAW, you have much more flexibility.
Because RAW files save all the image data, you can easily adjust the white balance later using editing software without noticeably reducing image quality.
This is one of the many reasons photographers enjoy shooting in RAW.
Which White Balance Should You Use?
For most beginners, my advice is simple:
Leave your camera on Auto White Balance (AWB).
Modern cameras are surprisingly good at choosing the correct white balance in most situations.
As you become more experienced, you can start experimenting with the different presets to create certain moods or to correct difficult lighting conditions. You should also try correcting the white balance of your image in post-processing, being able to correct the white balance is an essential skill that photographers should know.
The Simple Way to Think About White Balance
In reality, it's simply your camera trying to make colours look the way your eyes see them.
So before changing anything, ask yourself one question:
"Do the colours in my photo look natural?"
If they do, there's probably no need to adjust the white balance.
If everything looks too orange, too blue, or even slightly green, try a different white balance setting or, if you're shooting in RAW, make the adjustment later when editing.
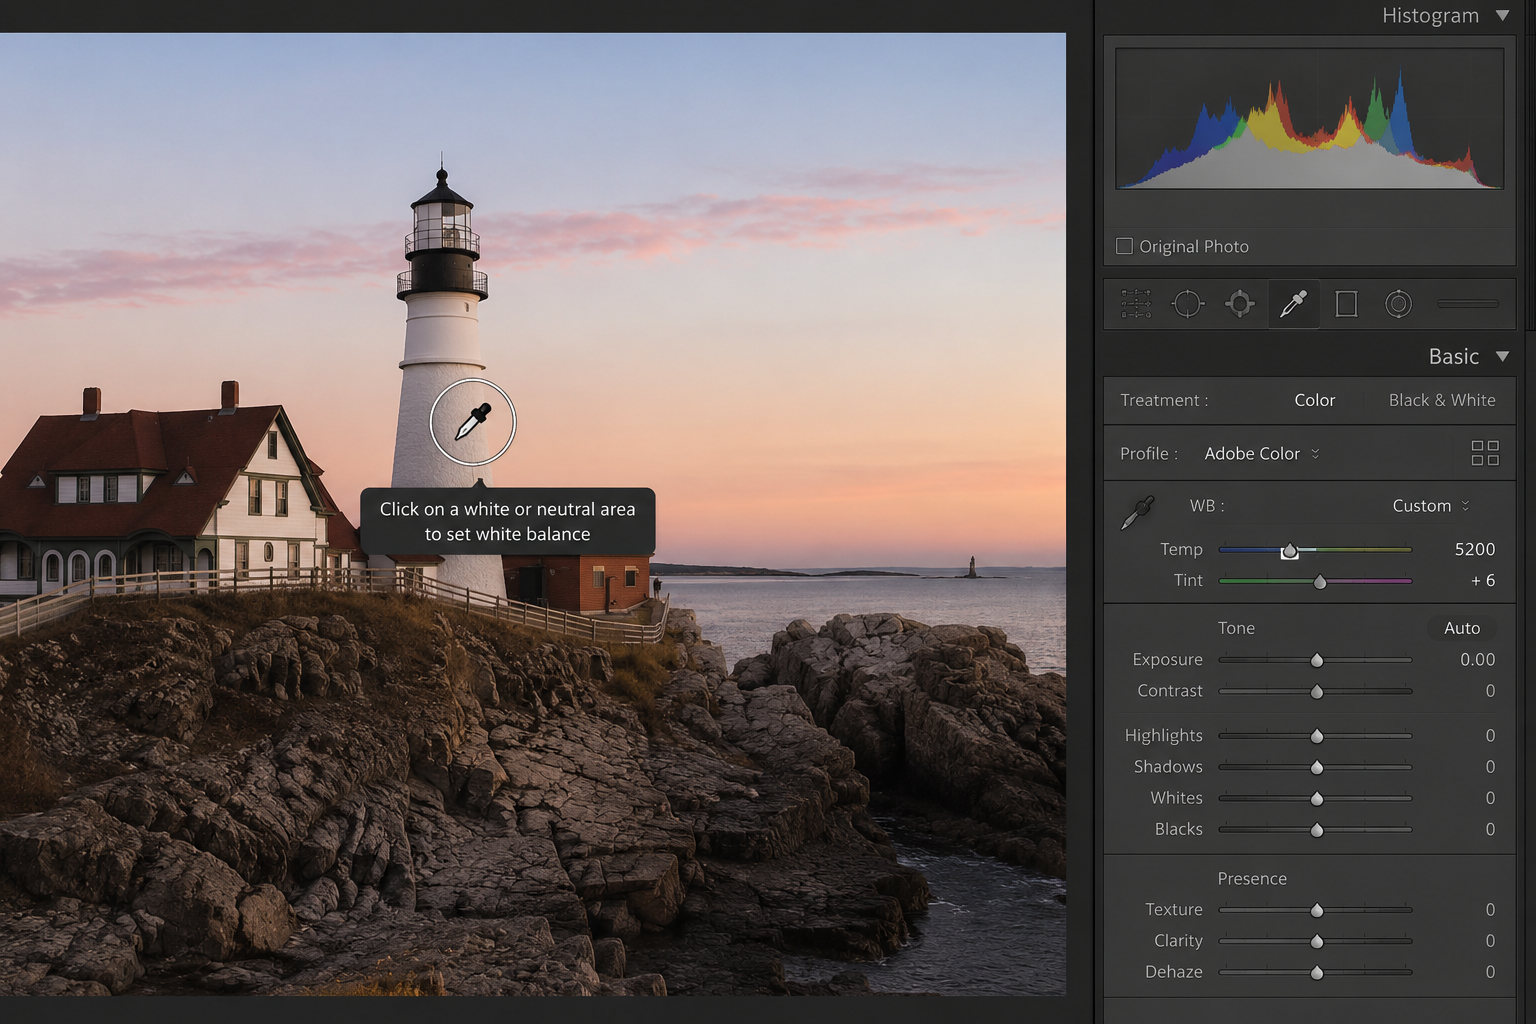
Jerome's tip: This is the 'one click' solution I was talking about earlier. In post processing, look for a white or Gray object in the photo. If there is a white object, click on it using the White Balance Eyedropper. That will tell the image editor that that is what white color is and the image editor will correct the colors of the picture accordingly.
7. Understanding Focus Modes
Have you ever taken a photo that looked perfectly sharp on your camera's screen, only to discover later that the subject wasn't actually in focus?
Or maybe you tried photographing a child running around, but every photo came out blurry?
The problem might not have been your camera—it could simply have been the focus mode you were using.
Focus modes tell your camera how to focus on your subject. Choosing the right one can make the difference between a sharp photo and a missed moment.
The good news is that there are only three focus modes most beginners need to know.
Single Autofocus (AF-S / One Shot AF)
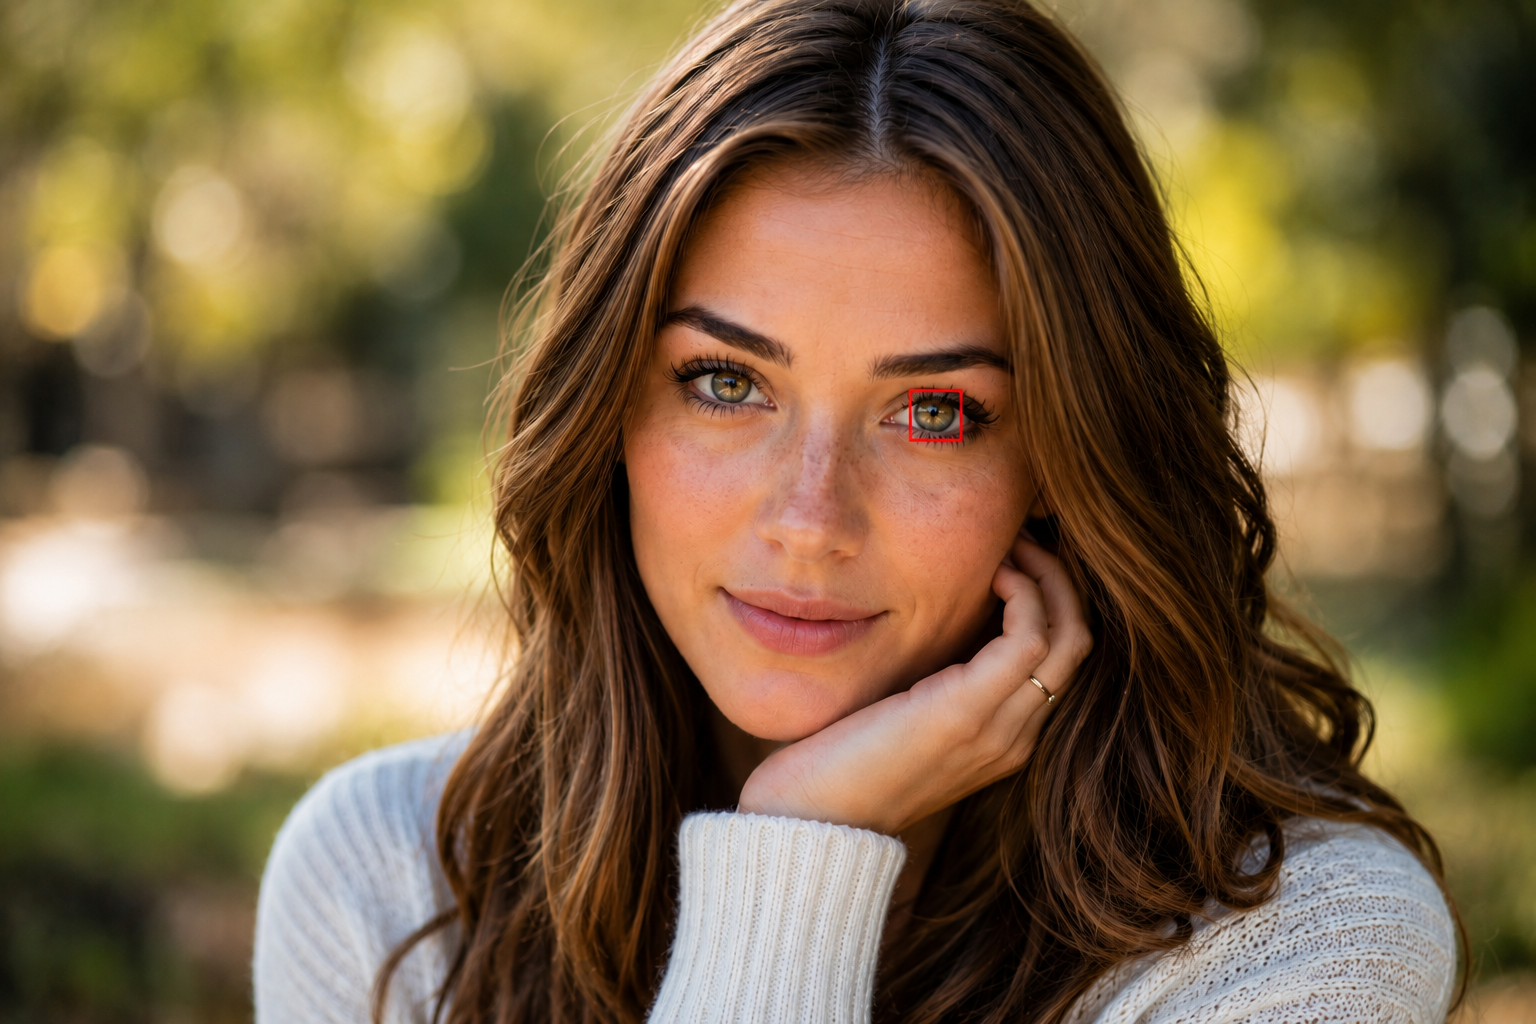
This is the focus mode you'll probably use most often.
On Canon cameras, it's called One Shot AF.
On Nikon, Sony, Fujifilm, and many other brands, it's called AF-S (Single Autofocus).
In this mode, the camera focuses once when you press the shutter button halfway.
Once it has found focus, it locks onto that point and won't change unless you release the button and focus again.
This works perfectly for subjects that aren't moving.
For example:
- Portraits
- Landscapes
- Buildings
- Flowers
- Food photography
If your subject is standing still, Single Autofocus is usually the best choice.
Continuous Autofocus (AF-C / AI Servo)
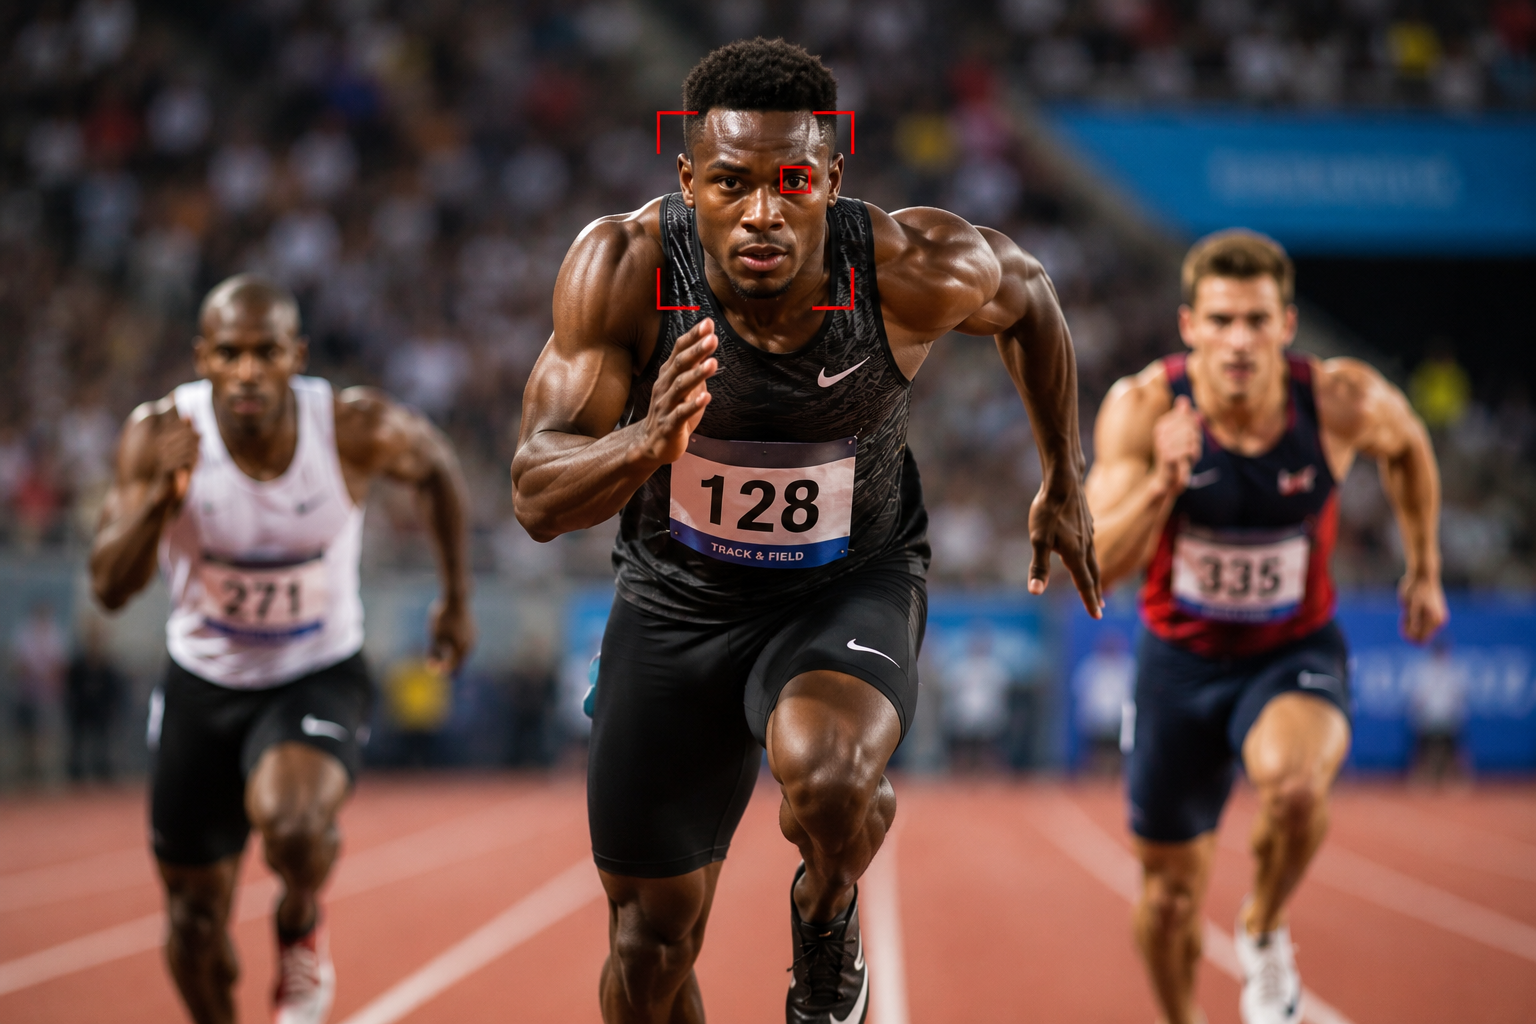
What happens if your subject won't stay still?
Imagine trying to photograph your dog running towards you, children playing in the park, or birds flying overhead.
If you use Single Autofocus, the camera focuses once—but your subject keeps moving. By the time you press the shutter, they may no longer be in focus.
That's where Continuous Autofocus comes in.
On Canon cameras, this mode is called AI Servo.
On most other brands, it's known as AF-C (Continuous Autofocus).
Instead of focusing only once, the camera continuously adjusts focus while you keep the shutter button pressed halfway.
It constantly tracks your subject as it moves.
This makes it ideal for:
- Sports
- Wildlife
- Birds
- Pets
- Children
- Anything that moves
If your subject is moving, Continuous Autofocus will usually give you a much better chance of capturing a sharp image.
Manual Focus (MF)
Sometimes, even the best autofocus systems struggle.
For example:
- Very dark environments
- Macro photography
- Shooting through fences or glass
- Night photography
- Landscapes where you want precise control
In these situations, you can switch your camera or lens to Manual Focus (MF).
Instead of the camera deciding what's in focus, you turn the focus ring on the lens yourself.
While it takes a little practice, Manual Focus gives you complete control over exactly where your image is sharp.
Jerome's Tip: I never use Manual focus myself as I find it hard to get it right but if you do use Manual focus, I encourage you to zoom in on the image on your camera screen to check and see if focus is correct and your image is pin sharp.
Which Focus Mode Should You Use?
As a general guide:
- Single Autofocus (AF-S / One Shot AF) → Portraits, landscapes, buildings, flowers, food, and other still subjects.
- Continuous Autofocus (AF-C / AI Servo) → Sports, wildlife, pets, children, and any moving subject.
- Manual Focus (MF) → Situations where autofocus struggles.
Focus Points
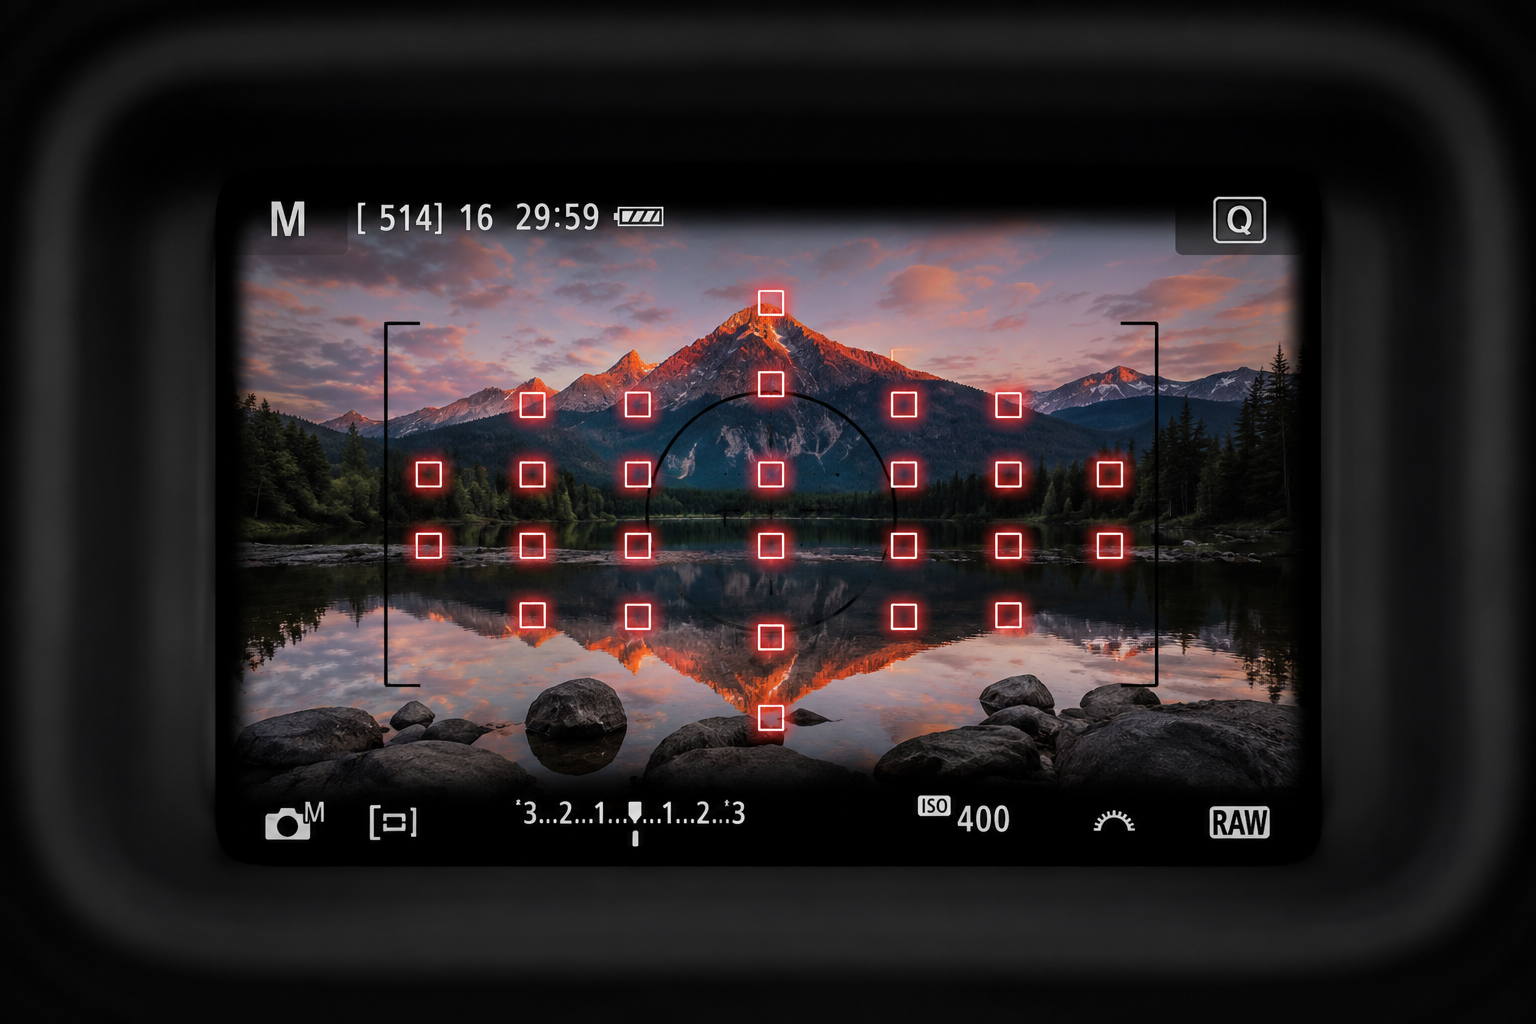
Most modern cameras also let you choose where the camera focuses.
Instead of always focusing in the middle of the frame, you can move the focus point to match your composition.
For example, when photographing a person, it's usually best to place the focus point over the eye that is closest to the lens (if the subject is positioned slightly sideways to the camera). Our eyes are naturally drawn to the eyes in a portrait, so if they're sharp, the whole photo usually feels sharp.
As you become more confident with your camera, learning how to move the focus point will give you even more creative control.
The Simple Way to Think About Focus Modes
Before taking a photo, ask yourself one simple question:
"Is my subject moving fast?"
If the answer is no, use Single Autofocus.
If the answer is yes, switch to Continuous Autofocus.
If the camera is struggling to focus at all, try Manual Focus.
It really is that straightforward.
Choosing the correct focus mode won't instantly make you a better photographer—but it will help you capture more sharp photos, and that's something every photographer wants.
8. Understanding Drive Modes
Imagine you're photographing your child blowing out birthday candles.
Or maybe you're trying to capture a bird taking flight or a football player scoring the winning goal.
You press the shutter button... but by the time the photo is taken, the perfect moment has already passed.
This is where Drive Modes can make a huge difference.
Drive Modes control how many photos your camera takes each time you press the shutter button.
Think of it as deciding whether your camera should take one photo or a series of photos.
The good news is that there are only three drive modes that most beginner photographers need to know.
Single Shot
Single Shot is the default setting on most cameras.
Every time you press the shutter button, the camera takes one photograph.
It's the perfect choice for subjects that aren't moving very much, where you have time to compose your shot carefully.
Single Shot works well for:
- Portraits
- Landscapes
- Architecture
- Food photography
- Travel photography
- Family photos
For most everyday photography, Single Shot is all you'll need.
Continuous Shooting (Burst Mode)
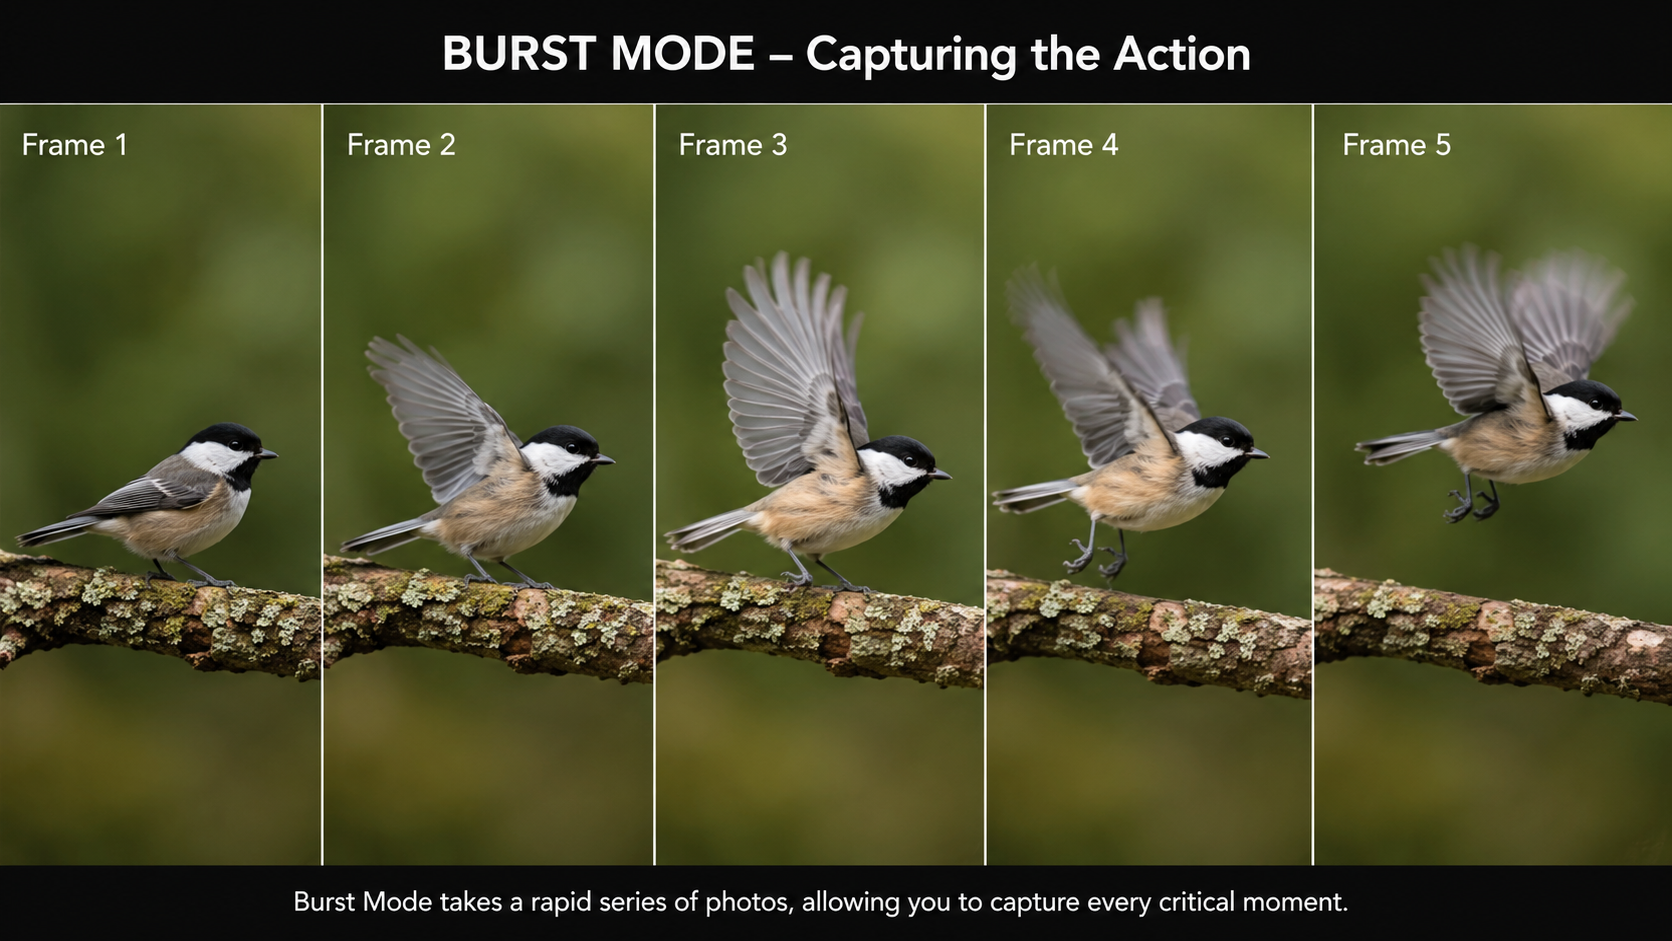
Continuous Shooting, often called Burst Mode, is designed for fast-moving action.
Instead of taking just one photo, the camera keeps taking pictures for as long as you hold the shutter button down.
Depending on your camera, this could be anywhere from 5 to over 30 photos every second (Many cameras can also let you decide how many photos to shoot at one burst).
Why is this useful?
Imagine photographing a football player heading the ball, a bird taking off, or your dog catching a frisbee.
If you only take one photo, you might miss the perfect moment.
But if your camera captures a rapid burst of images, you can choose the best one afterwards.
Burst Mode is ideal for:
- Sports
- Wildlife
- Birds in flight
- Pets
- Children playing
- Any fast-moving subject
One press of the shutter button can capture an entire sequence of action.
Self-Timer
The third drive mode you'll probably use is the Self-Timer.
Instead of taking the photo immediately, the camera waits a few seconds before releasing the shutter.
Most cameras allow you to choose a 2-second or 10-second delay.
This is useful when:
- You want to be in the photo yourself.
- You're using a tripod and want to avoid shaking the camera when pressing the shutter button.
The 2-second timer is especially handy for landscape photography because it allows any vibrations from pressing the shutter button to disappear before the photo is taken, helping produce the sharpest image possible.
Which Drive Mode Should You Use?
As a general guide:
- Single Shot → Portraits, landscapes, buildings, food, travel, and everyday photography.
- Continuous Shooting (Burst Mode) → Sports, wildlife, birds, pets, children, and action photography.
- Self-Timer → Group photos, selfies with a tripod, long exposures, and landscape photography on a tripod.
Don't Leave Burst Mode On All the Time
When I first discovered Burst Mode, I thought it was amazing.
I started using it for almost everything!
The problem was that every time I pressed the shutter button, my camera filled the memory card with dozens of nearly identical photos. Instead of sorting through one image, I now had twenty.
Burst Mode is an incredibly useful tool but it's best saved for moments where the action is changing quickly and every fraction of a second matters.
The Simple Way to Think About Drive Modes
Before taking a photo, ask yourself one simple question:
"Am I trying to capture one moment or a sequence of moments?"
If you're photographing something still, use Single Shot.
If your subject is moving quickly and you don't want to miss the perfect moment, switch to Burst Mode.
If you're going to be in the photo yourself, or you're using a tripod and want to eliminate camera shake, choose the Self-Timer.
It's a small setting that many beginners overlook, but once you start using the right drive mode for the situation, you'll find yourself capturing more of those once-in-a-lifetime moments.
9. Understanding Metering Modes
Have you ever taken a photo of someone standing in front of a bright sunset, only to find that the person looks almost completely black?
Or maybe you've photographed a snowy landscape, but the snow turned out dull and grey instead of bright white?
If so, your camera wasn't broken, it was simply making its best guess about the exposure.
This is where Metering Modes come in.
Metering modes tell your camera which parts of the scene it should pay the most attention to when deciding how bright or dark the photo should be.
Think of your camera as having a little light meter built inside it.
Before every photo, it measures the light in the scene and decides what it thinks is the correct exposure.
Most of the time, it does a great job.
But sometimes the scene can fool it.
Evaluative Metering (Matrix Metering)
This is the default setting on most cameras.
Canon calls it Evaluative Metering, while Nikon and some other manufacturers call it Matrix Metering.
Don't worry about the different names, they both do essentially the same thing.
The camera looks at the entire scene and considers many different areas before deciding on the exposure.
For everyday photography or changing light conditions, this is usually the best choice.
It works well for:
- Portraits
- Landscapes
- Travel photography
- Family photos
- Street photography
In fact, many photographers leave their camera on this setting almost all the time because it's reliable in most situations.
Centre-Weighted Metering
Centre-Weighted Metering still looks at the whole scene, but it gives more importance to the centre of the frame.
Imagine photographing a person standing in front of a bright background.
Instead of giving equal importance to everything, the camera pays more attention to the subject near the middle.
This mode can be useful when your main subject is near the centre of the image and the background is much brighter or darker.
Spot Metering
Spot Metering is the most precise of the three modes.
Instead of measuring the whole scene, the camera measures only a very small area—usually around your active focus point or the centre of the frame.
This is incredibly useful when your subject is much brighter or darker than the background.
For example:
- A bird against a bright sky.
- A person standing in front of a sunset.
- A performer under a spotlight.
- The moon in the night sky.
By measuring only your subject, the camera ignores much of the surrounding light and can produce a much more accurate exposure.
Which Metering Mode Should You Use?
For most beginners, my advice is very simple.
Leave your camera on Evaluative (or Matrix) Metering.
Modern cameras are remarkably good at analysing a scene, and this mode works well in the vast majority of situations.
As you gain experience, you can experiment with Centre-Weighted or Spot Metering when you're photographing difficult lighting conditions.
The Simple Way to Think About Metering Modes
Before changing your metering mode, ask yourself one simple question:
"Is my subject much brighter or darker than the rest of the scene?"
If the answer is no, leave your camera on Evaluative (Matrix) Metering.
If the answer is yes, Spot Metering may help you get a better exposure.
For most beginner photographers, that's really all you need to remember.
Your camera is very good at measuring light, you just need to know that, every now and then, you can give it a little guidance.
10. Understanding Exposure Compensation
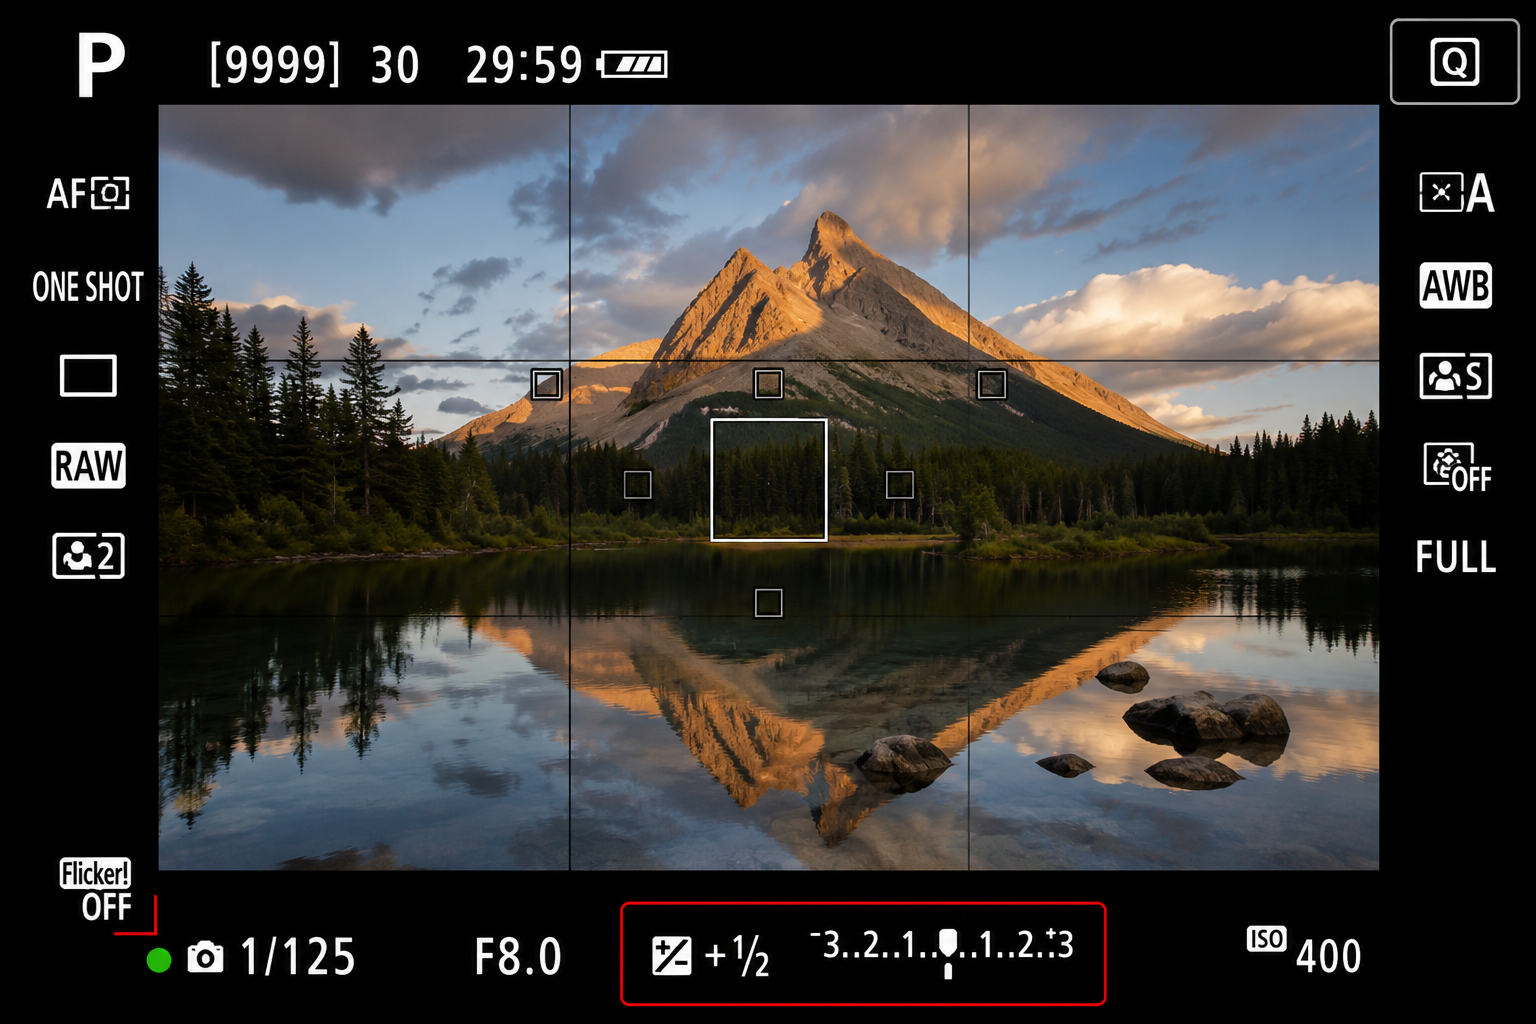
By now you've learned about aperture, shutter speed, ISO, and metering. Your camera uses all of these settings to decide what it thinks is the "correct" exposure.
But here's something every photographer eventually discovers...
Your camera isn't always right.
Sometimes you'll take a photo and think:
"That looks a little too dark."
Or perhaps:
"That looks much brighter than I wanted."
This is where Exposure Compensation becomes one of the most useful settings on your camera.
Exposure Compensation allows you to tell your camera:
"I know what you think is the correct exposure, but I'd like this photo to be a little brighter... or a little darker."
It's one of the quickest and easiest ways to improve your photos without having to change lots of camera settings.
Finding Exposure Compensation
On most cameras, Exposure Compensation is shown as a ± (plus/minus) symbol.
You can usually adjust it using a dial or a button combined with one of the camera's control wheels.
The values normally look something like this:
- -2
- -1
- -0.3
- 0
- +0.3
- +1
- +2
The numbers are simple to understand:
- Positive (+) values make your photo brighter.
- Negative (-) values make your photo darker.
- 0 means no adjustment at all.
When Would You Use It?
Let's look at a couple of common situations.
Snow
Imagine you're photographing a beautiful snowy landscape.
Your camera sees all that bright white snow and thinks,
"This scene is very bright, I should darken it."
The result?
Instead of bright white snow, you end up with snow that looks dull and grey.
By adding +1 or even +2 Exposure Compensation, you tell the camera to brighten the image, making the snow look much more natural.
A Person in Front of a Sunset
Now imagine you're photographing someone standing in front of a colourful sunset.
The camera notices the bright sky and tries to expose for it.
Unfortunately, that often leaves your subject looking almost completely black.
Adding a little positive Exposure Compensation can brighten your subject and create a more balanced image.
On the other hand, there may be times when you actually want your subject to appear as a silhouette. In that case, leaving the exposure as it is, or even reducing it slightly, can produce a dramatic effect.
Dark Subjects
Here's another example.
Imagine photographing a black dog lying on green grass.
Your camera may think the scene is too dark and automatically brighten the image.
The result?
The dog's fur can lose its rich, dark appearance and start looking grey.
By using a small amount of negative Exposure Compensation, you can keep those darker tones looking more natural.
Does Exposure Compensation Work in Every Shooting Mode?
Exposure Compensation works best when your camera is controlling at least one part of the exposure.
That means you'll usually use it in:
- Program Mode (P)
- Aperture Priority (A or Av)
- Shutter Priority (S or Tv)
If you're shooting in Manual Mode, you're already choosing the aperture, shutter speed, and ISO yourself, so you simply adjust those settings directly instead of using Exposure Compensation.
The Simple Way to Think About Exposure Compensation
Your camera can measure light...
But it can't read your mind.
It doesn't know whether you're photographing bright snow, a dark dog, or someone standing in front of a sunset.
It can only make its best guess.
Exposure Compensation gives you the final say.
So before changing anything, ask yourself one simple question:
"Does this photo look the way I want it to?"
If it looks a little too dark, add a small amount of positive (+) Exposure Compensation.
If it looks too bright, reduce it with a little negative (-) Exposure Compensation.
You don't have to make huge changes either. Even adjusting the exposure by +0.3, +0.7, or -0.3 can make a noticeable difference.
It's a small setting that many beginners overlook, but once you start using it, you'll wonder how you ever managed without it.
And with that, you've learned the ten camera settings that I believe every beginner photographer should know.
Don't worry about trying to master all of them at once. Pick one setting, head outside with your camera, and spend an afternoon experimenting with it. Then move on to the next.
If there's one thing I'd like you to take away from this post, it's this: don't worry about memorizing every setting or getting everything right straight away.
Photography isn't about perfection, it's about curiosity, creativity, and enjoying the process of seeing the world a little differently. The more you pick up your camera and experiment with these settings, the more they'll start to make sense. Before long, you'll find yourself changing them without even thinking.
So don't be afraid to make mistakes. Some of my favourite photos have come from simply trying something new and seeing what happened. Every photo you take teaches you something, whether it's a stunning shot you'll be proud to share or one that didn't quite turn out the way you hoped.
Keep shooting, keep learning, and most importantly, have fun. Because at the end of the day, that's what photography is really all about.
If you are interested in reading, here are some posts on some of the weddings I have photographed.
All the best!!
Jerome